In today’s rapidly evolving digital landscape, securing your cloud infrastructure against unauthorized access and potential cyber threats has never been more important. As organizations increasingly migrate their operations to the cloud, the need for robust security measures becomes paramount. This is where a bastion host, or jump server, comes into play. Acting as a secure, controlled gateway to access private network resources from an external network, bastion hosts are a cornerstone of cloud security strategies. This blog will delve into the essence of bastion hosts, guiding you through the process of setting one up in an AWS environment and elucidating its critical role in bolstering your network’s defense mechanisms.
Table Of Content
- Step 1: Launching The Bastion Host
- Step 2: Configuring Security Groups
- Step 3: Accessing Private Instances Via Bastion Host
- Conclusion
In the realm of cloud computing, securing your infrastructure while maintaining accessibility for authorized users is paramount. A bastion host, often referred to as a jump server, plays a critical role in this scenario. Let’s dive into what a bastion host is, how to set it up on AWS, and its significance in safeguarding your cloud environment.
What is a Bastion Host?
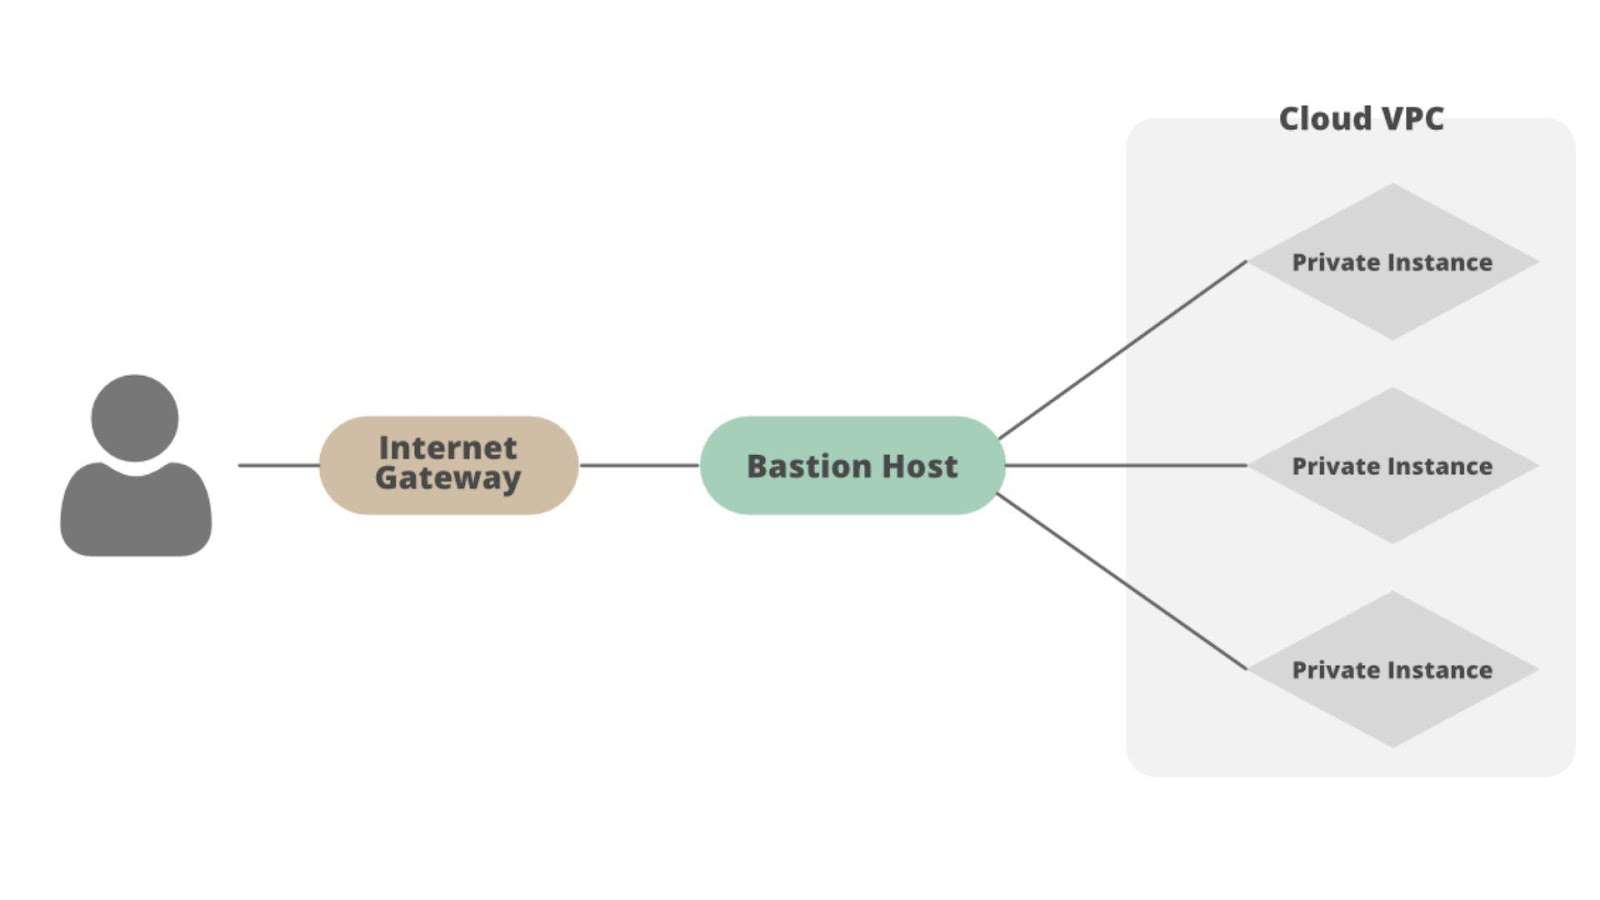
A bastion host is a server specifically designed to provide access to a private network from an external network, such as the internet. It acts as a gateway through which a user can access internal servers without exposing them directly to the outside world. By limiting the points of entry to the network, a bastion host significantly reduces the potential attack surface, enhancing the overall security posture of your infrastructure.
Importance of Bastion Hosts
Bastion hosts are crucial for several reasons:
- Security: They provide a strong layer of security by ensuring that only authenticated and authorized users can access the internal network.
- Audit and Monitoring: All the SSH (Secure Shell) sessions can be logged and monitored, providing an audit trail of user activities.
- Simplified Management: Managing access control through a single point makes it easier to enforce policies and update configurations as needed.
Prerequisites
Before we start setting up a bastion host on AWS, ensure you have the following:
- An AWS account.
- A basic understanding of VPCs, Subnets, EC2 instances, and Security Groups.
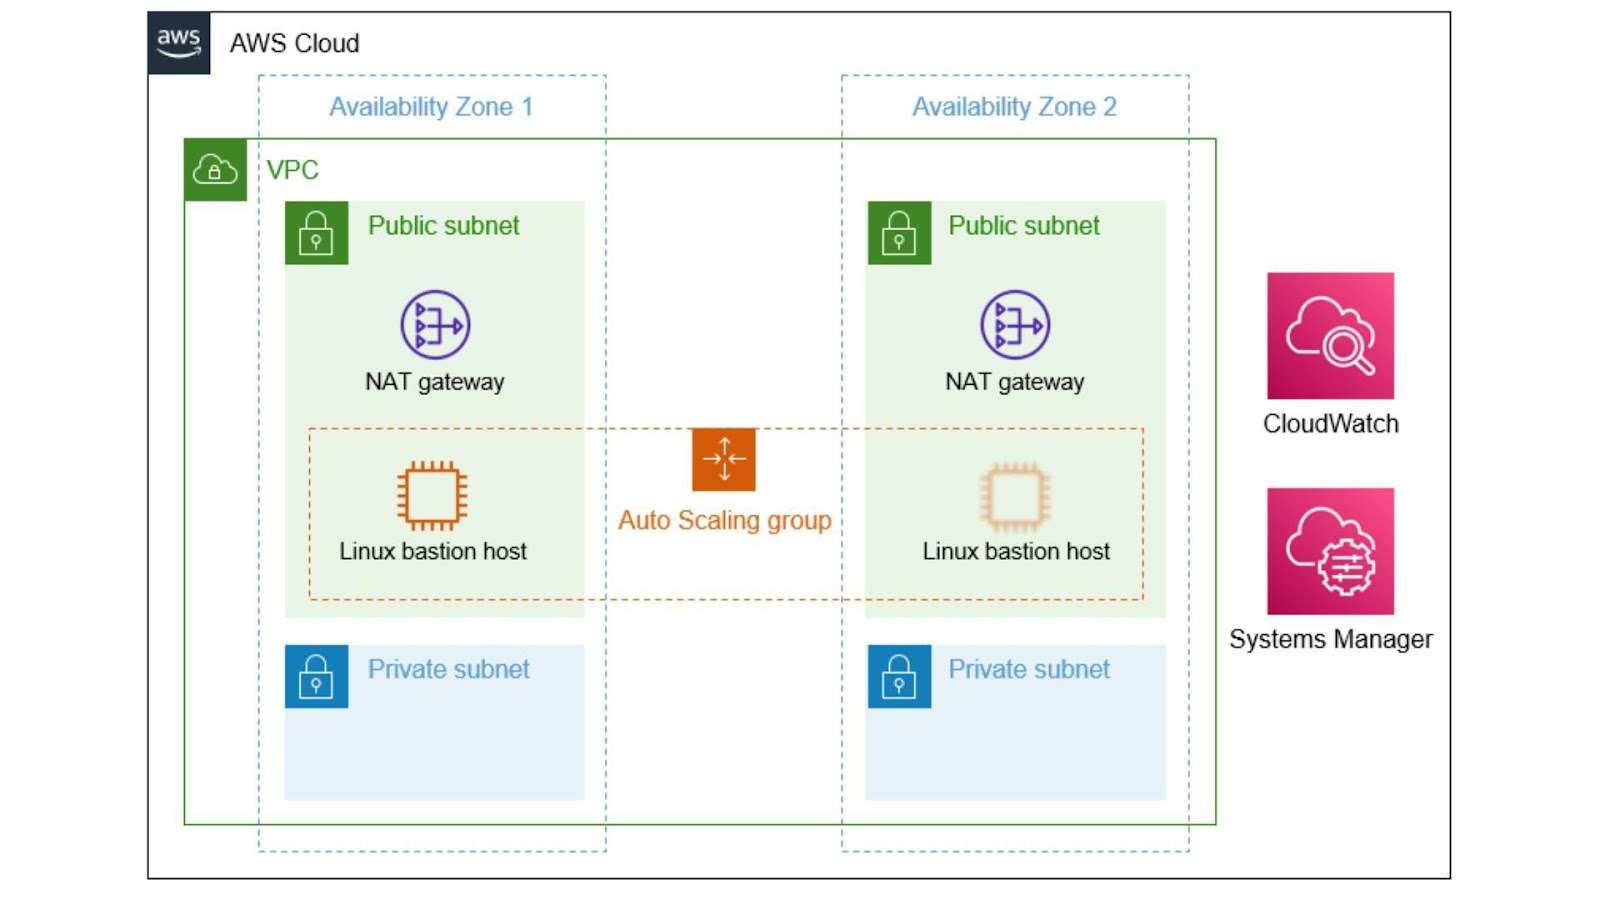
- A Virtual Private Cloud (VPC) with both public and private subnets.
Setting Up a Bastion Host on AWS
Step 1: Launching the Bastion Host
- Create an EC2 Instance for Bastion Host:
- Navigate to the EC2 Dashboard in the AWS Management Console.
- Click on “Launch Instance” to create a new instance.
- Select an Amazon Machine Image (AMI) that suits your requirements, such as Amazon Linux 2 or Ubuntu.
- Choose an instance type, like t2.micro for testing purposes.
- Configure instance details to select your VPC, launch the instance into a public subnet, and enable auto-assign public IP.
- Add storage if necessary.
- Configure Security Group:
- Create a new security group for the bastion host.
- Allow SSH (port 22) access from your IP address to ensure secure access.
Step 2: Configuring Security Groups
- Bastion Host Security Group: Ensure it allows inbound SSH traffic (port 22) from your local IP address or a range of trusted IP addresses.
- Private EC2 Instances Security Group: Modify it to allow inbound SSH traffic (port 22) from the bastion host’s security group, ensuring that only the bastion can initiate SSH connections to the private instances.
Step 3: Accessing Private Instances via Bastion Host
SSH into Bastion Host:
- Use the SSH command with your key file to connect to the bastion host.
| ssh -i /path/to/your-private-key.pem ec2-user@your-bastion-ip |
SSH from Bastion to Private Instance:
- Once connected to the bastion, SSH into your private EC2 instance using its private IP. For enhanced security, consider SSH agent forwarding with the -A flag instead of copying your private keys to the bastion.
| ssh -i /path/to/private-instance-key.pem ec2-user@private-instance-private-ip |
- How to SSH with Agent Forwarding:
| ssh -i /path/to/your/private/key.pem -J bastion_username@bastion_host_public_ip private_server_username@private_instance_ip |
- Replace the placeholders with your details. For example:
| ssh -i /home/ubuntu/dev-drlogy.pem -J ubuntu@13.127.162.123 ubuntu@10.0.11.50 |
By following these steps, you can set up a bastion host on AWS, enhancing the security and manageability of your cloud infrastructure. Remember, the bastion host serves as a critical checkpoint, ensuring that only authorized users can access your internal network, thereby fortifying your security posture.
Conclusion
Setting up a bastion host on AWS is a strategic step towards fortifying your cloud infrastructure’s security. By funneling all external SSH traffic through a single, secure entry point, bastion hosts significantly minimize the risk of unauthorized access and potential breaches. While the setup process involves several meticulous steps, including launching an EC2 instance, configuring security groups, and establishing SSH connections, the payoff in enhanced security and peace of mind is invaluable. Remember, in the dynamic and often perilous realm of cloud computing, the bastion host stands as a vigilant sentinel, guarding the gates to your digital fortress. As cyber threats continue to evolve, integrating such proactive security measures is not just advisable; it’s imperative for safeguarding your cloud-based assets and ensuring the continuity of your operations in a secure environment.