Why AWS Is Your Ideal Jenkins Hosting Platform
Choosing the right platform to host your Jenkins instance is critical for any organization implementing Continuous Integration/Continuous Delivery (CI/CD). While on-premises solutions offer familiarity, many DevOps teams are migrating their Jenkins deployments to AWS. This shift is fueled by the benefits AWS provides in terms of Jenkins performance, scalability, and cost-effectiveness.
Scalability and Availability: Matching Your Build Demands
A key reason AWS excels as a Jenkins hosting platform is its elastic scalability. Unlike fixed on-premises infrastructure, AWS allows you to dynamically adjust resources to meet your build needs. Experiencing a surge in demand? Easily scale up your EC2 instances to manage the load. When things quiet down, scale back down to minimize expenses. This flexibility ensures your CI/CD pipelines operate smoothly, regardless of workload fluctuations. AWS’s global availability also allows distributed teams in different time zones to collaborate effectively.
Cost Optimization: Pay for What You Use
AWS's pay-as-you-go pricing model fits well with the variable nature of CI/CD workloads. You only pay for the resources consumed, avoiding investments in expensive hardware that might sit idle. This can lead to substantial cost savings, especially for organizations with fluctuating build demands. Using spot instances for non-critical builds, for example, can reduce costs by up to 90%. This granular control over resources helps optimize your Jenkins environment for cost efficiency without sacrificing performance.
Security and Integration: A Robust Foundation for Your CI/CD
AWS offers robust security features that integrate with Jenkins, creating a layered security approach. AWS Identity and Access Management (IAM) lets you precisely control access to your Jenkins instance and other AWS resources. This ensures only authorized personnel manage your CI/CD pipelines. Reinforcing this integration, AWS has significantly invested in the Jenkins project, including a $60,000 donation to support its cloud operations. This commitment underscores the strategic importance of Jenkins within the AWS ecosystem. Learn more about this partnership: Discover more insights about AWS's support of Jenkins.
Diverse Compute Options: Tailoring Performance to Your Needs
AWS offers a broad selection of compute options, from general-purpose EC2 instances to specialized compute-optimized instances. This allows customization of your Jenkins environment to precisely match your workloads. Whether your builds are CPU-intensive or memory-demanding, AWS offers an instance type to maximize performance. This flexibility, along with the ability to install Jenkins on AWS in various configurations (single-master or multi-master), ensures the scalability and reliability needed for complex, large-scale CI/CD operations. Installing Jenkins on AWS allows organizations to build, test, and deploy software faster and more efficiently.

Setting the Stage: Prerequisites for Jenkins on AWS
Before diving into setting up Jenkins on AWS, it's essential to lay the proper groundwork. Just like constructing a building, a solid foundation is crucial for a smooth and secure deployment. This involves configuring security groups, selecting the right EC2 instance, and setting up the appropriate IAM permissions. These steps ensure your Jenkins setup is optimized for performance, security, and cost-effectiveness.
Choosing the Right EC2 Instance
Selecting the appropriate EC2 instance depends on the anticipated workload and the size of your team. For smaller teams with less demanding builds, a t2.medium instance might be sufficient. This provides a balance of cost and performance for lighter tasks.
However, larger teams with complex builds and frequent deployments will benefit from more powerful instances like m5.large or c5.large. These instances offer more processing power and memory, allowing Jenkins to handle more concurrent jobs and larger codebases. Choosing the right instance type from the start can prevent performance bottlenecks and ensure smooth operation. Understanding the role of a CI Server is important when selecting an appropriate instance.
To help you choose, here's a table summarizing recommended instance types:
Recommended EC2 Instance Types for Jenkins on AWS
A comparison of different AWS EC2 instance types suitable for Jenkins installations based on team size and workload
| Instance Type | vCPUs | Memory (GiB) | Recommended Workload | Approximate Monthly Cost |
|---|---|---|---|---|
| t2.medium | 2 | 4 | Small teams, light builds | $20 |
| t3.medium | 2 | 4 | Small to medium teams, moderate builds | $30 |
| m5.large | 2 | 8 | Medium teams, frequent deployments | $70 |
| c5.large | 2 | 4 | Medium to large teams, CPU-intensive builds | $60 |
| m5.xlarge | 4 | 16 | Large teams, complex builds | $140 |
This table provides a general guideline. Actual costs may vary based on region and usage. Be sure to consult the AWS pricing page for the most up-to-date information.
IAM Permissions: The Principle of Least Privilege
Granting your Jenkins instance the correct IAM permissions is crucial for security. Following the principle of least privilege, grant only the necessary permissions required for Jenkins to interact with other AWS services. This limits the potential damage from a security breach by minimizing access.
For example, if your Jenkins jobs need to upload artifacts to S3, grant access only to the specific S3 bucket required, not the entire S3 service. This granular approach to permissions enhances security.
Security Groups: Protecting Your Instance
Security groups act as a virtual firewall for your EC2 instances. Configure your security groups to allow inbound traffic only on the necessary ports. This includes port 8080 for the Jenkins dashboard and port 22 for SSH access. Restricting unnecessary inbound traffic strengthens the security posture of your Jenkins instance.
Additionally, configure outbound traffic to allow Jenkins to communicate with other required AWS services. This ensures that Jenkins can perform its tasks while maintaining a secure environment.
Networking: VPC Design Considerations
A well-designed Virtual Private Cloud (VPC) is essential for a secure and efficient Jenkins setup. Consider factors like subnet configuration, Network Access Control Lists (ACLs), and route tables. Your VPC design should provide adequate isolation for your Jenkins environment while still allowing access for your development teams.
This balance of security and accessibility is vital for an efficient workflow. More information on DevOps implementation is available in this guide: How to master your DevOps implementation. This resource offers further insights into effective DevOps strategies and how Jenkins fits into the larger picture. Properly planning these prerequisites will ensure a secure and optimized Jenkins environment on AWS, ready to handle your CI/CD pipelines.
Install Jenkins on AWS EC2: The Definitive Walkthrough
Setting up Jenkins on an Amazon EC2 instance can seem daunting, but this guide will break down each step, from choosing your Amazon Machine Image (AMI) to accessing your Jenkins dashboard.
The infographic below illustrates the first three steps in preparing your AWS EC2 instance: selecting the AMI, configuring instance settings, and opening the necessary security ports.
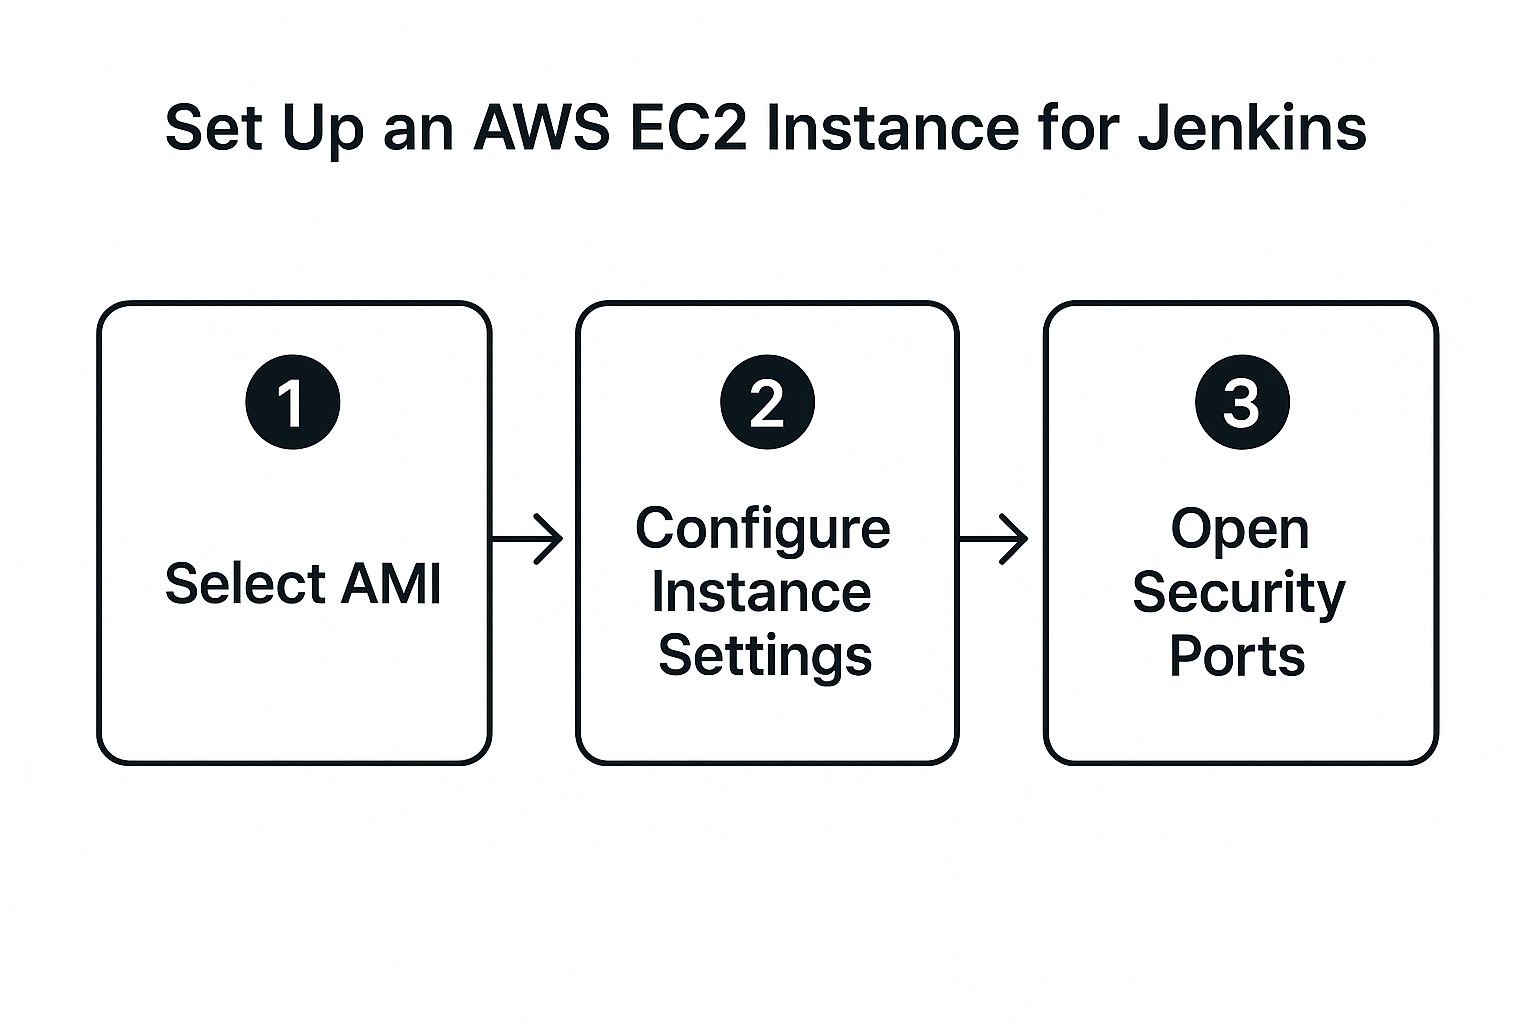
These initial steps are essential for correctly configuring your instance to host Jenkins, creating a secure and readily available environment. This foundation will streamline the installation and minimize potential issues.
Preparing Your EC2 Instance
Begin by connecting to your EC2 instance using SSH. Once connected, update all system packages to ensure you're using the most recent versions, a critical practice for maintaining system security and stability. Execute the command sudo apt update to refresh the package list.
Then, upgrade the installed packages with sudo apt upgrade -y. This guarantees your system is current and mitigates potential conflicts during the Jenkins installation process.
Installing Java: The Foundation for Jenkins
Jenkins relies on Java to function, so the next step is installing the Java Development Kit (JDK). OpenJDK is a widely used choice due to its open-source nature and compatibility.
Installing OpenJDK 11, a stable Long-Term Support (LTS) release, is generally recommended. Use this command: sudo apt install openjdk-11-jdk -y. After installation, confirm the Java version with java -version to ensure it’s correctly installed.
Installing Jenkins: The Core of Your CI/CD
With Java installed, you can proceed with the Jenkins installation. First, add the Jenkins repository key: curl -fsSL https://pkg.jenkins.io/debian/jenkins.io.key | sudo tee /usr/share/keyrings/jenkins-keyring.asc > /dev/null.
Next, add the Jenkins repository to your sources list: echo deb [signed-by=/usr/share/keyrings/jenkins-keyring.asc] https://pkg.jenkins.io/debian binary/ | sudo tee /etc/apt/sources.list.d/jenkins.list > /dev/null. Update the package list again with sudo apt update to include the new Jenkins repository. Finally, install Jenkins: sudo apt install jenkins -y.
Deploying Jenkins on AWS provides several benefits, including adaptable single-master or multi-master configurations. Netflix, for example, uses over 25 Jenkins masters on AWS to manage its complex CI/CD pipelines. This allows for streamlined management and improved scalability. You can learn more about AWS deployment strategies (https://d1.awsstatic.com/whitepapers/DevOps/Jenkins_on_AWS.pdf).
Starting and Accessing Jenkins
After installation, start the Jenkins service with sudo systemctl start jenkins. Enable Jenkins to start automatically at boot time: sudo systemctl enable jenkins. You can check the service status using sudo systemctl status jenkins.
Jenkins typically runs on port 8080. Access the dashboard by entering your EC2 instance's public IP address or domain name followed by port 8080 in your web browser (e.g., http://<your_instance_public_ip>:8080).
You'll need the initial administrator password located in the Jenkins log file at /var/lib/jenkins/secrets/initialAdminPassword. This password grants access to your Jenkins instance, completing the core installation. You're now ready to configure and customize your Jenkins environment for your specific CI/CD requirements.
Optimizing Your Jenkins Performance on AWS
Now that your Jenkins server is up and running on AWS, let's explore how to maximize its performance. This section offers practical guidance, drawing from real-world experience, to help you get the most out of your AWS-hosted Jenkins. We'll delve into how seasoned DevOps teams fine-tune their configurations, focusing on JVM settings, executor configurations, and AWS-specific optimizations.
Fine-Tuning JVM Settings for Optimal Performance
The Java Virtual Machine (JVM) is the heart of Jenkins. Incorrect JVM settings can easily lead to out-of-memory errors, especially when dealing with complex, resource-intensive builds. Experienced DevOps professionals understand the importance of carefully adjusting these settings.
Increasing the heap size, for example, gives Jenkins more memory to work with, allowing it to handle larger builds without crashing. You can do this by modifying the JENKINS_JAVA_OPTIONS environment variable in your Jenkins configuration file. Finding the right balance is crucial. Allocating too much memory can negatively impact overall system performance, while too little can cause instability and build failures.
Executor Configuration: Balancing Parallelism and Resources
Jenkins executors control the number of concurrent builds. Having too many can overload your EC2 instance, slowing down individual build times and potentially exhausting resources. Too few executors, on the other hand, create a bottleneck, causing builds to queue up and delaying your CI/CD pipelines.
The optimal number of executors depends on your EC2 instance size and the typical resource demands of your builds. Start with a lower number, monitor your resource utilization, and gradually increase as needed. This iterative process allows you to find the right balance between maximizing parallelism and efficient resource usage.
Leveraging AWS-Specific Features for Jenkins
AWS provides a rich set of tools and services that integrate seamlessly with Jenkins to enhance performance and optimize costs. One powerful strategy is using spot instances for non-critical builds. This can dramatically reduce your infrastructure costs, sometimes by as much as 90%.
Another key optimization is leveraging Amazon S3 for storing build artifacts. S3 offers a highly durable and scalable storage solution, freeing up valuable space on your Jenkins server. You should also consider using Amazon ECR for storing your Docker images. This provides a secure and private registry for your containerized applications.
For more insights on optimizing your CI/CD workflows on AWS, take a look at this resource: How to master AWS CodePipeline for cost-performance and security.
Essential Plugins for AWS Integration
When running Jenkins on AWS, certain plugins are indispensable for smooth operation and efficient integration with AWS services. These plugins streamline workflows and unlock powerful features.
To understand the essential plugins and their benefits, refer to the table below:
Essential Jenkins Plugins for AWS Integration: A list of must-have Jenkins plugins when running on AWS infrastructure, their features, and benefits
| Plugin Name | Primary Function | AWS Service Integration | Benefits |
|---|---|---|---|
| Amazon EC2 plugin | Dynamically provision EC2 instances as build agents | EC2 | Auto-scaling build capacity based on demand |
| Amazon S3 plugin | Upload and download artifacts to/from S3 buckets | S3 | Secure and scalable artifact storage |
| Amazon ECR plugin | Interact with Amazon ECR for container image management | ECR | Simplified container deployments |
| AWS Credentials Binding plugin | Securely manage AWS credentials within Jenkins | IAM | Enhanced security and access control |
| AWS CloudFormation plugin | Manage CloudFormation stacks from Jenkins | CloudFormation | Infrastructure-as-code integration with your CI/CD pipeline |
These plugins enable critical functionalities like dynamic agent provisioning, automated backups to S3, and streamlined deployments to ECR, significantly improving your Jenkins workflow on AWS.
Implementing Artifact Caching: Accelerate Your Builds
Artifact caching is a powerful technique that can dramatically reduce build times by reusing previously built dependencies. If a dependency hasn't changed since the last build, there's no need to rebuild it from scratch. Jenkins provides built-in caching mechanisms, and various plugins offer extended caching functionalities.
Strategically implementing caching, particularly for larger projects with numerous dependencies, can significantly accelerate your CI/CD pipeline. This translates to faster feedback loops, quicker releases, and improved developer productivity. By combining these optimizations – fine-tuning your JVM, configuring executors appropriately, leveraging AWS-specific features, and integrating key plugins – you can dramatically boost your Jenkins performance on AWS, ensuring a fast, reliable, and cost-effective CI/CD pipeline.
Slash Your AWS Costs While Running Jenkins at Scale
Running Jenkins on AWS offers immense flexibility and scalability, but managing costs can be a challenge. This section explores proven strategies to optimize your AWS spend while maintaining high performance for your Jenkins CI/CD pipelines. We'll examine auto-scaling, spot instances, right-sizing, and other best practices to help you achieve significant cost savings.
Auto-Scaling Jenkins Agents: Dynamic Resource Allocation
One of the most effective ways to control costs is by implementing auto-scaling for your Jenkins agents. This allows your infrastructure to dynamically adjust to changing build demands. During peak hours, the system automatically spins up more EC2 instances to handle the increased workload.
During off-peak times or weekends, when build activity is lower, these extra instances are terminated. This ensures you only pay for the resources you actually need. This automated approach eliminates idle instances, significantly lowering your AWS bill.
Leveraging Spot Instances for Cost-Effective Scaling
For non-critical builds, consider leveraging EC2 Spot Instances. These instances utilize spare AWS capacity and offer significant cost savings—potentially up to 90% compared to on-demand instances. While spot instances can be interrupted, they're ideal for fault-tolerant tasks within your CI/CD pipeline.
When installing Jenkins on AWS, using EC2 Spot Instances is a notable example of cost optimization. This allows users to leverage unused EC2 capacity at significantly discounted prices. Companies like Lyft have reported substantial savings by integrating Spot Instances into their Jenkins CI pipelines. This strategy is especially effective for flexible workloads where interruptions can be tolerated, making Spot Instances a valuable resource for optimizing CI/CD workflows on AWS. Explore this topic further: Discover more insights about using spot instances for Jenkins cost optimization.
Right-Sizing Your Jenkins Master Instance: Avoiding Overspending
The size of your Jenkins master instance should also be carefully evaluated. An oversized instance will incur unnecessary expenses. Conversely, an undersized instance can create performance bottlenecks.
Data-driven decision-making is key. Monitor your master instance’s CPU utilization, memory usage, and disk I/O to identify potential areas for optimization. This information will guide you in selecting the appropriately sized instance that meets your needs without wasted resources. This practice of right-sizing ensures optimal performance at the lowest possible cost.
Storage Tiering for Build Artifacts: Long-Term Cost Savings
Optimizing storage costs is another critical aspect of managing expenses. Implement storage tiering to move older, less frequently accessed build artifacts to lower-cost storage options like Amazon S3 Glacier. This keeps your active artifacts readily available while archiving older ones at a lower cost.
This approach not only saves money but also ensures your important build artifacts remain accessible long-term. This combination of accessibility and cost-effectiveness provides significant value over time.
Comprehensive Tagging: Understanding Cost Attribution
Implementing a robust tagging strategy provides granular visibility into your AWS spending. Tag your EC2 instances, S3 buckets, and other resources with relevant project or team identifiers. This enables precise cost allocation, allowing you to track spending by team, project, or any other custom dimension.
Understanding where your money is going is the first step towards optimization. This clear cost attribution fosters accountability and facilitates more informed financial decisions. By incorporating these strategies, you can effectively manage and reduce your AWS costs when running Jenkins at scale, ensuring optimal resource utilization and financial efficiency. This holistic approach empowers you to get the most out of AWS while keeping costs under control.

Bulletproof Security For Your Jenkins AWS Deployment
Security breaches in CI/CD pipelines can have devastating consequences. This section focuses on strengthening your Jenkins installation on AWS against potential threats. We'll use insights from security-focused DevOps professionals to build comprehensive protection for your Jenkins environment.
Network Isolation and Least Privilege: Laying The Groundwork
Implementing a defense-in-depth strategy starts with network isolation. Your Jenkins instance shouldn’t be publicly accessible. Instead, place it within a private subnet in your Virtual Private Cloud (VPC). This limits exposure to external threats.
Furthermore, use Network Access Control Lists (NACLs) to restrict traffic flow within your VPC. This adds another layer of security.
The principle of least privilege is crucial. Only grant your Jenkins instance the permissions absolutely necessary for interacting with other AWS services. This minimizes the potential damage from a security breach.
For instance, if Jenkins needs to access an S3 bucket, grant access only to that specific bucket, not the entire S3 service.
Secure Credential Management: Protecting Sensitive Information
Never store credentials directly in your Jenkins configuration files. This risky practice exposes sensitive information. Instead, use the AWS Credentials Binding plugin.
This plugin lets Jenkins securely retrieve credentials from AWS Secrets Manager or IAM roles, keeping your sensitive data protected and significantly reducing the risk of exposure.
HTTPS and Authentication: Secure Access To Your Jenkins Dashboard
Configuring HTTPS for your Jenkins instance is vital for secure communication. Use AWS Certificate Manager to obtain and manage SSL/TLS certificates, simplifying the process. HTTPS encrypts all communication between your browser and the Jenkins server, protecting sensitive data.
Implement robust authentication to control access to your Jenkins dashboard. Integrate Jenkins with your existing identity provider, like Active Directory or Okta, for centralized user management. This improves security and provides a consistent login experience.
Plugin Security Governance: Mitigating Risks From Third-Party Code
Jenkins plugins add functionality, but they can also introduce security vulnerabilities. Create a plugin security governance process to manage plugin installations and updates.
Regularly review installed plugins, remove unused plugins, and keep the remaining plugins updated. This minimizes your attack surface and keeps your Jenkins environment secure.
Monitoring and Alerting: Proactive Threat Detection
Effective monitoring helps identify security issues before they become major incidents. Configure monitoring to track key metrics like login attempts, plugin installations, and configuration changes.
Set up alerts to notify you of suspicious activity. This allows for quick intervention, minimizing the impact of potential breaches. Also, consider best practices outlined in guides like Top Cloud Security Best Practices to Protect Your Data.
By combining network isolation, least privilege, secure credential management, HTTPS, strong authentication, plugin governance, and robust monitoring, you can build a highly secure Jenkins environment on AWS. This protects your CI/CD pipeline and safeguards your data, ensuring a secure software delivery process.
Troubleshooting Your Jenkins on AWS Installation
Setting up Jenkins on AWS can be incredibly useful, but sometimes, issues can arise. This section offers practical troubleshooting advice, drawn from the experiences of DevOps engineers, to help you quickly diagnose and fix common installation problems.
Connectivity Issues: Verifying Network Access
One of the most common problems is trouble accessing the Jenkins dashboard. This often comes down to misconfigured security groups or network ACLs. Start by checking if your security group allows inbound traffic on port 8080, the default for Jenkins. Also, double-check your network ACLs to ensure they're not blocking necessary traffic.
For instance, if you recently changed your security group or NACL, try reverting the changes to see if the problem is resolved. This process of elimination can quickly pinpoint the source. Securing your Jenkins deployment on AWS is critical. For additional security best practices, consider an AWS security audit checklist to strengthen your Jenkins setup.
Jenkins Service Failures: Checking Logs and Status
If the Jenkins service isn't running, use the command sudo systemctl status jenkins to check its status. The output often provides valuable clues about what went wrong. Also, look at the Jenkins log files at /var/lib/jenkins/logs for detailed error messages.
These logs often pinpoint the specific issue. For example, a common problem is low disk space. Checking disk usage and removing unnecessary files can often quickly fix this. This proactive approach helps ensure a smooth CI/CD process.
Java-Related Errors: Verifying Installation and Configuration
Since Jenkins runs on Java, problems with your Java installation can affect Jenkins. Verify you have a compatible Java version installed using java -version. Also, ensure the JAVA_HOME environment variable is properly set in your Jenkins configuration files so Jenkins can find and use the right Java runtime.
Incorrect Java settings can cause issues like "out of memory" errors, especially during large builds. Adjusting the JVM's heap size can help with this. Increasing the maximum heap size lets Jenkins use more memory for builds.
Plugin Compatibility Issues: Identifying and Resolving Conflicts
Plugin conflicts can cause various problems, from build failures to Jenkins instability. If you recently added a plugin and started having problems, try disabling it to see if that helps. Check the Jenkins logs for any plugin-related errors.
Incompatible plugins can often be identified through their logs. If a specific plugin is causing issues, check for updates or look for alternatives that offer the same features. This helps maintain stability and prevents build failures.
Build Failures: Examining Build Logs and Configurations
Build failures are common in CI/CD. Check the console output of failed builds to see exactly where the failure occurred. The error messages often provide enough information to diagnose the cause. This is far more efficient than randomly adjusting settings.
A common reason for build failures is a missing dependency. Double-checking the dependencies listed in your project's build file is important. This careful attention to build configuration can avoid delays and keep your pipelines running smoothly.
Performance Degradation: Monitoring Resource Usage
If your builds are slow or Jenkins feels sluggish, monitor your EC2 instance's resources, such as CPU usage, memory consumption, and disk I/O. High resource use might mean your instance isn't powerful enough. Upgrading to a larger instance type might solve the problem.
This also applies to JVM heap size. If it's too small, it can cause frequent garbage collection and slow things down. Analyzing JVM memory usage is key to finding the right heap size.
Using these troubleshooting techniques can help you quickly identify and resolve Jenkins issues on AWS, leading to a more reliable CI/CD process and more efficient software delivery.
Ready to improve your CI/CD workflows? Check out the cloud and DevOps solutions from Signiance Technologies at https://signiance.com. We can help you build and manage strong, scalable, and secure Jenkins environments for your needs.