Transforming Viewer and Origin Requests/Responses Like a Pro
Lambda@Edge is a powerful AWS compute service that allows you to run code closer to your users by executing Lambda functions at AWS edge locations worldwide. Unlike traditional Lambda functions that run in specific AWS regions, Lambda@Edge functions run in response to CloudFront events, enabling you to customize content delivery with minimal latency. In this comprehensive tutorial, you’ll learn how to create, deploy, and test Lambda@Edge functions that modify HTTP requests and responses at different CloudFront event triggers.
What You’ll Build
By the end of this tutorial, you’ll have created a Lambda@Edge function that:
- Adds security headers to HTTP responses for enhanced website security
- Modifies viewer requests to implement custom routing logic
- Handles origin requests to add authentication tokens
- Transforms responses before they reach end users
Prerequisites
Before starting this tutorial, ensure you have:
- An active AWS account with administrative access
- Basic knowledge of JavaScript (Node.js) or Python
- Understanding of the HTTP request/response cycle
- Familiarity with CloudFront distributions
- An S3 bucket for testing (we’ll create one in this tutorial)
Estimated completion time: 45–60 minutes
Estimated cost: Less than $1 USD (within free tier limits)
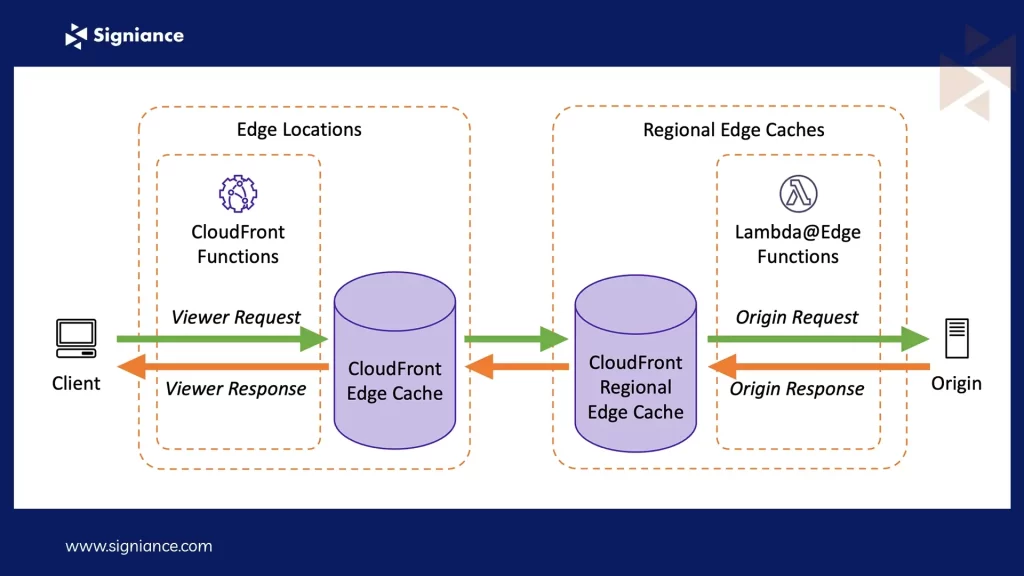
Understanding Lambda@Edge Event Triggers
Lambda@Edge can be triggered at four different CloudFront event stages:
- Viewer Request: Triggered when CloudFront receives a request from a viewer (before checking the CloudFront cache)
- Origin Request: Triggered when CloudFront forwards a request to the origin (cache miss)
- Origin Response: Triggered when CloudFront receives a response from the origin
- Viewer Response: Triggered before returning the response to the viewer
Each trigger type serves different use cases, and you can attach multiple functions to the same distribution.
Part 1: Setting Up Your CloudFront Distribution
Step 1: Create an S3 Bucket for Origin Content
- Navigate to the S3 console at https://console.aws.amazon.com/s3/
- Click Create bucket
- Enter a unique bucket name (e.g., lambda-edge-demo-yourname-2025)
- Select your preferred AWS Region
- Keep Block all public access unchecked (we’ll use CloudFront for access control)
- Acknowledge the warning about public access
- Click Create bucket
- Upload a simple index.html file to your bucket with the following content:
<!DOCTYPE html>
<html lang="en">
<head>
    <meta charset="UTF-8">
    <meta name="viewport" content="width=device-width, initial-scale=1.0">
    <title>Lambda@Edge Demo</title>
</head>
<body>
    <h1>Welcome to Lambda@Edge Tutorial</h1>
    <p>This content is delivered through CloudFront with Lambda@Edge modifications.</p>
    <p id="timestamp"></p>
    <script>
        document.getElementById('timestamp').textContent =
            'Page loaded at: ' + new Date().toLocaleString();
    </script>
</body>
</html>
Step 2: Create CloudFront Distribution
- Navigate to the CloudFront console at https://console.aws.amazon.com/cloudfront/
- Click Create distribution
- Under Origin domain, select your S3 bucket from the dropdown
- For Origin access, select Origin access control settings (recommended)
- Click Create control setting and accept the default settings
- Under Default cache behavior:
- Viewer protocol policy: Redirect HTTP to HTTPS
- Allowed HTTP methods: GET, HEAD
- Cache key and origin requests: Cache policy and origin request policy (recommended)
7. Under Settings:
- Price class: Use all edge locations (best performance)
- Alternate domain name (CNAME): Leave blank for now
- Keep other settings as the default
8. Click Create distribution
9. Wait for the distribution status to change from “Deploying” to “Enabled” (this takes 5–10 minutes)
10. Copy the S3 bucket policy that CloudFront provides and update your S3 bucket permissions
Part 2: Creating Your First Lambda@Edge Function
Step 3: Create Lambda Function in us-east-1
Note: Lambda@Edge functions MUST be created in the us-east-1 (N. Virginia) region.
- Navigate to the Lambda console at https://console.aws.amazon.com/lambda/
- Ensure you’re in the US East (N. Virginia) region (check the top-right corner)
- Click Create function
- Select Use a blueprint
- In the search box, type cloudfront to filter CloudFront blueprints
- Select cloudfront-modify-response-header blueprint
- Configure the basic information:
- Function name: AddSecurityHeadersEdge
- Execution role: Create a new role from AWS policy templates
- Role name: lambda-edge-security-headers-role
- Policy templates: Select Basic Edge Lambda permissions
8. Click Create function
9. In the Deploy to Lambda@Edge popup that appears, click Cancel (we’ll configure this later)
Step 4: Update Function Code
Replace the default code with the following enhanced security headers implementation:
'use strict';

export const handler = async (event, context) => {
    // Get contents of response
    const response = event.Records[0].cf.response;
    const headers = response.headers;

    // Set comprehensive security headers
    headers['strict-transport-security'] = [{
        key: 'Strict-Transport-Security',
        value: 'max-age=63072000; includeSubdomains; preload'
    }];

    headers['content-security-policy'] = [{
        key: 'Content-Security-Policy',
        value: "default-src 'self'; script-src 'self' 'unsafe-inline'; style-src 'self' 'unsafe-inline'"
    }];

    headers['x-content-type-options'] = [{
        key: 'X-Content-Type-Options',
        value: 'nosniff'
    }];

    headers['x-frame-options'] = [{
        key: 'X-Frame-Options',
        value: 'DENY'
    }];

    headers['x-xss-protection'] = [{
        key: 'X-XSS-Protection',
        value: '1; mode=block'
    }];

    headers['referrer-policy'] = [{
        key: 'Referrer-Policy',
        value: 'strict-origin-when-cross-origin'
    }];

    // Add custom header to track Lambda@Edge execution
    headers['x-lambda-edge-modified'] = [{
        key: 'X-Lambda-Edge-Modified',
        value: 'true'
    }];

    return response;
};
Code Explanation:
- We’re modifying the origin response event, which fires when CloudFront receives content from the origin
- Each security header is added to the response headers object
- The function returns the modified response
- Headers improve security by preventing XSS attacks, clickjacking, and enforcing HTTPS
10. Click Deploy to save your changes
11. Wait for the “Successfully updated function” message
Step 5: Publish Function Version
Lambda@Edge requires a numbered version (not $LATEST).
- Click Actions → Publish new version
- Enter description: Initial version with security headers
- Click Publish
- Note the function version ARN (you’ll see it changes to include :1 at the end)
Part 3: Deploying to Lambda@Edge
Step 6: Add CloudFront Trigger
- On your Lambda function page, scroll to the Function overview section
- Click Add trigger
- In the trigger configuration:
- Select a trigger: CloudFront
- Deploy to Lambda@Edge: Click the checkbox to confirm
- Distribution: Select your CloudFront distribution from the dropdown
- CloudFront event: Select Origin response
- Cache behavior: Default (*)
- Check I acknowledge that the execution role…
4. Click Deploy
5. Confirm the deployment in the popup (this will replicate your function globally)
Wait Time: The function replication takes 5–15 minutes. CloudFront needs to deploy the updated configuration to all edge locations worldwide.
6. Go back to your CloudFront distribution
7. You’ll see the status changed to “Deploying”
8. Wait until it shows the last modified timestamp
Part 4: Testing Your Lambda@Edge Function
Step 7: Verify Function Execution
- Copy your CloudFront distribution domain name (e.g., d1234567890abc.cloudfront.net)
- Open the URL in your browser
- You should see your index.html content
- Open Browser Developer Tools (F12)
- Go to the Network tab
- Refresh the page
- Click on the HTML document request
- Navigate to the Headers section
- Scroll to Response Headers
Expected Headers to Verify:
- strict-transport-security: max-age=63072000; includeSubdomains; preload
- content-security-policy: default-src ‘self’…
- x-content-type-options: nosniff
- x-frame-options: DENY
- x-xss-protection: 1; mode=block
- referrer-policy: strict-origin-when-cross-origin
- x-lambda-edge-modified: true
Step 8: Test from Different Locations (Optional)
Use online tools to test from different geographic locations:
- GTmetrix ( https://gtmetrix.com/ )
- WebPageTest ( https://www.webpagetest.org/ )
This confirms your Lambda@Edge function runs at edge locations globally.
Part 5: Advanced Modifications, Viewer Request Function
Step 9: Create a URL Rewrite Function
Let’s create a second function that modifies viewer requests to implement custom routing.
- Return to Lambda console (us-east-1)
- Create a new function:
- Function name: URLRewriteEdge
- Runtime: Node.js 20.x
- Execution role: Use existing role lambda-edge-security-headers-role
3. Add the following code:
'use strict';

export const handler = async (event, context) => {
    const request = event.Records[0].cf.request;
    const uri = request.uri;

    // Rewrite /blog to /blog/index.html
    if (uri.endsWith('/blog')) {
        request.uri = '/blog/index.html';
    }

    // Add trailing slash if missing and no file extension
    else if (!uri.includes('.') && !uri.endsWith('/')) {
        request.uri = uri + '/';
    }

    // Default document handling
    if (uri.endsWith('/')) {
        request.uri += 'index.html';
    }

    // Add custom header to track request modification
    request.headers['x-rewrite-applied'] = [{
        key: 'X-Rewrite-Applied',
        value: 'true'
    }];

    console.log(`Original URI: ${uri}, Modified URI: ${request.uri}`);

    return request;
};
4. Deploy and publish Version 1
Get Nitesh Taliyan’s stories in your inbox
Join Medium for free to get updates from this writer.Subscribe
5. Add CloudFront trigger:
- CloudFront event: Viewer request
- Use the same distribution
6. Wait for deployment (5–15 minutes)
Part 6: Origin Request Modification
Step 10: Add Authentication Headers
Create a function that adds custom headers to origin requests:
'use strict';

export const handler = async (event, context) => {
    const request = event.Records[0].cf.request;

    // Add custom origin headers
    request.headers['x-custom-origin-header'] = [{
        key: 'X-Custom-Origin-Header',
        value: 'lambda-edge-origin-request'
    }];

    // Add timestamp
    request.headers['x-request-timestamp'] = [{
        key: 'X-Request-Timestamp',
        value: new Date().toISOString()
    }];

    // You could add authentication tokens here
    // request.headers['authorization'] = [{
    //     key: 'Authorization',
    //     value: 'Bearer YOUR-TOKEN'
    // }];

    return request;
};
Deploy as Origin request trigger.
Monitoring and Debugging
Step 11: CloudWatch Logs
- Navigate to the CloudWatch console
- Go to Logs → Log groups
- Look for log groups matching: /aws/lambda/us-east-1.{FunctionName}
- Note: Logs appear in the region closest to where the function executed
- Click into a log group to see execution details
- Each invocation shows:
- Request ID
- Duration
- Memory used
- Any console.log() output
Step 12: CloudWatch Metrics
- In your Lambda function, click the Monitor tab
- View metrics:
- Invocations
- Duration
- Error count
- Throttles
Testing Different Scenarios
Test Case 1: Security Headers Validation
Command:
curl -I https://your-distribution.cloudfront.net/
Expected Output:
HTTP/2 200
strict-transport-security: max-age=63072000; includeSubdomains; preload
x-lambda-edge-modified: true
content-security-policy: default-src 'self'...
Test Case 2: URL Rewrite Testing
Command:
curl -I https://your-distribution.cloudfront.net/blog
Should internally rewrite to /blog/index.html
Test Case 3: Edge Location Verification
Check which edge location served your request:
- x-cache: Shows HIT or MISS from CloudFront
- x-amz-cf-pop: Shows the edge location code (e.g., IAD89-P2)
Performance Considerations
Function Execution Limits
Lambda@Edge has specific limitations:
- Viewer request/response: 128 MB memory, 5-second timeout
- Origin request/response: 128 MB memory, 30-second timeout
- Maximum response body size: 1 MB
- No environment variables support
- No VPC access
Best Practices
- Keep functions lightweight: Minimize dependencies and code size
- Use appropriate triggers: Viewer request for routing, origin response for headers
- Avoid heavy computations: Edge functions should execute quickly
- Cache responses when possible: Reduce function invocations
- Monitor costs: Each invocation is billed
Cost Analysis
Pricing Breakdown (as of November 2025)
Lambda@Edge Costs:
- Requests: $0.60 per 1 million requests
- Duration: $0.00005001 per GB-second
Example Monthly Cost:
- 1 million requests
- Average duration: 50ms
- Memory: 128 MB
Calculation:
Requests: 1,000,000 × $0.60/1M = $0.60
Duration: 1,000,000 × 0.05s × 0.125GB × $0.00005001 = $0.31
Total: ~$0.91/month
CloudFront Costs:
- Data transfer and HTTP requests apply separately
- First 10 TB: $0.085 per GB (varies by region)
Cost Optimization Tips:
- Use CloudFront caching aggressively to reduce function invocations
- Monitor and optimize function execution time
- Consider CloudFront Functions for simpler use cases (cheaper alternative)
Cleanup Resources
Step 13: Remove Lambda@Edge Associations
- Go to CloudFront distribution
- Select Behaviors tab
- Edit default behavior
- Remove all Lambda@Edge function associations
- Save changes
- Wait for deployment
- Delete Lambda functions (must wait until all replicas are removed — can take several hours)
- Disable and delete the CloudFront distribution
- Empty and delete the S3 bucket
Troubleshooting Common Issues
Issue 1: Function Not Executing
Symptoms: Headers not appearing in responses
Solutions:
- Verify function is published (not $LATEST version)
- Check the CloudFront distribution status is “Deployed”
- Wait for full replication time (15+ minutes)
- Clear browser cache and test in incognito mode
- Check CloudWatch logs for errors
Issue 2: “The function execution role must be assumable by edgelambda.amazonaws.com”
Solution:
Ensure your Lambda execution role has this trust policy:
{
  "Version": "2012-10-17",
  "Statement": [{
    "Effect": "Allow",
    "Principal": {
      "Service": [
        "lambda.amazonaws.com",
        "edgelambda.amazonaws.com"
      ]
    },
    "Action": "sts:AssumeRole"
  }]
}
Issue 3: Response Size Limit Exceeded
Error: “The Lambda@Edge response size exceeded the maximum allowed size”
Solution:
- Origin response body limit: 1 MB
- Ensure you’re not adding large headers
- Compress response bodies if needed
Conclusion
You’ve successfully created and deployed three Lambda@Edge functions that modify CloudFront requests and responses at different event triggers. You’ve learned how to:
- Set up CloudFront distributions with S3 origins
- Create Lambda@Edge functions in us-east-1
- Deploy functions to global edge locations
- Modify viewer and origin requests/responses
- Monitor function execution through CloudWatch
- Implement security headers for enhanced website protection
- Test and validate edge function behavior
Lambda@Edge provides powerful capabilities to customize content delivery with minimal latency, enabling sophisticated edge computing scenarios. The functions you’ve built demonstrate practical use cases for security, routing, and request modification that can be applied to production workloads.
Key Takeaways:
- Always create Lambda@Edge functions in us-east-1 region
- Publish numbered versions before deployment
- Allow adequate time for global replication
- Monitor costs and optimize function execution time
- Use appropriate event triggers for different use cases